Bring 3D HREM Datasets Into The Physical Realm With 3D Printing
- ashley7671
- Mar 10, 2023
- 2 min read
Updated: Jun 27, 2023
HREM (High Resolution Episcopic Microscopy) allows for the visualisation of 3D datasets through a series of 2D images. In this article we will discuss the process of turning these virtual stacks into blown up physical models.

1. Take the dataset and process to remove background and Invert. As with any dataset this can be done in Fiji (Image) or through OHREM Utilities (Indigo Scientific). When opening the dataset be sure not to use a virtual stack. It may be a good idea at this point to scale your images as the full resolution will not be needed.
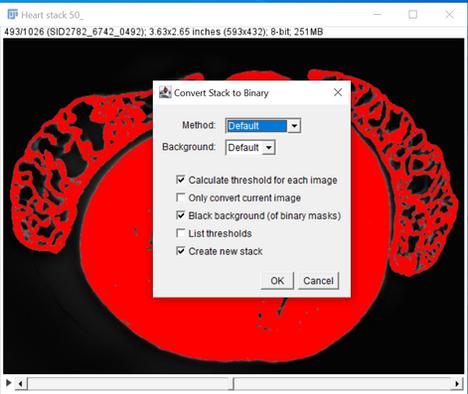
2. In Fiji Create a mask of the inverted image by going through the menu
Process -> Binary -> Convert to Mask
3. Now we must fill in the holes. To do this go to Process -> Binary -> Fill Holes
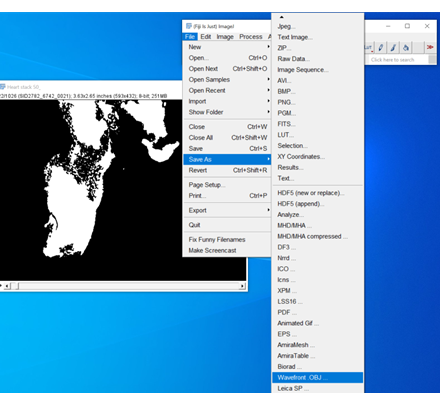
4. Now convert the stack to an OBJ format. This process may take a few minutes, despite the file being available please allow time for this update.
Once complete the windows software viewer can open the obj file.
5. Using a package such as Fusion 360 Import the OBJ file, once imported we will have to reduce the mesh and re-scale. Using a lower mesh will add artefacts but ultimately give an easier file to work with. Finding the best balance is important.
7. Now we can save this as an stl using the export feature. We then can open our chosen slicer, in our case Cura, and import the .stl file and slice it. Be sure to select the correct settings as the slicing can take a while due to the complexity of the model.
8. Send this to the printer and print, here is our result from a 6 Hour print on low settings:
Want to try this for yourself? Why not contact us for a free stack/stl file to try printing.


Comments